EKS (Elastic Kubernetes service) is an AWS-managed Kubernetes service , and the Master Node was managed by AWS itself. We need to...
EKS (Elastic Kubernetes service) is an AWS-managed Kubernetes service, and the Master Node was managed by AWS itself. We need to create the Master node with the required permissions and choose the required Add-ons.
In EKS we need to do the Four Major Steps.
1. Provision an EKS cluster (Master Node) -- EKS automatically deploys Kubernetes control plane
2. Deploy worker nodes -- Add worker nodes to your EKS cluster
3. Connect to EKS -- Point your favorite Kubernetes tooling at your EKS cluster
4. Run Kubernetes apps -- Deploy your Kubernetes applications to your EKS cluster
Amazon EKS exposes a Kubernetes API endpoint. Your existing Kubernetes tooling can connect directly to the managed control plane. Worker nodes run as EC2 instances in your account.
Note: Before Creating the Cluster, make sure you log in as an IAM user and that the user has full access.
To create the Eks cluster, we need to open the AWS Eks service and click the create option to create the cluster.

To create the cluster we need to do the Six steps
1. Configure cluster
2. Specify networking
3. Configure observability
4. Select add-ons
5. Configure selected add-on settings
6. Review and create
1. Configure cluster
For the cluster configuration, you should type your cluster's name and choose the Kubernetes version for the cluster. The Latest version is 1.31
We also need to create the IAM role for the AWS EKS cluster. If you have already made you can choose the existing IAM role or click Create a Role in the IAM console option and create the New IAM role for Master Node.
In this Role creation Step choose the type “AWS service” choose Eks cluster as service and click next.
The permission entry page already selected the permission policy for the EKS cluster. We have another option called set permission boundary and it is optional,
If you need extra permission for your role then you can choose a Use a permissions boundary to control the maximum role permissions options or just keep it as Create role without a permissions boundary. Now I keep it the same. Click the next option.


Cluster Access mode Choose EKS API and configmap to enable the encryption by turning on the KMS and choosing the KMS key.
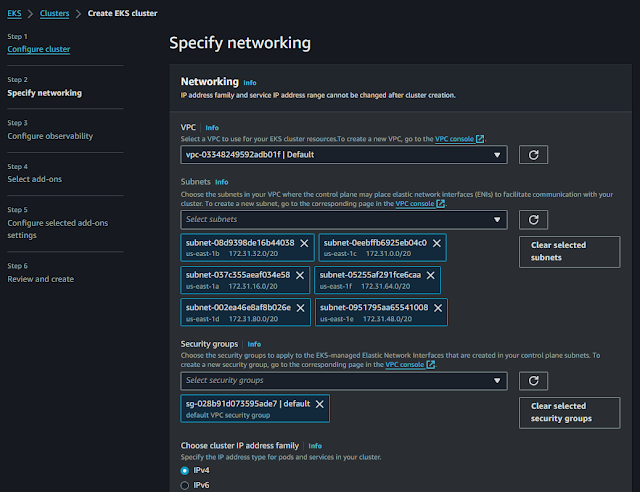
2. Specify networking:
The second part needs to choose our networks like VPC, subnet, security group, IP type, and cluster endpoint.
The Endpoint access can be chosen as public or private. If you want your cluster more secure you can use an SSM instance to connect the cluster.

3. Configure observability
In the Observability section, we can enable the AMP(Amazon-managed Prometheus). It will Monitor your application and infrastructure metrics with Amazon Managed Service for Prometheus. These metrics include system health and performance data.
We can monitor the logs of control-plane(master node) by enabling the API server, Audit, Authenticator, Controller manager, and Scheduler,
4. Select add-ons:
Amazon VPC CNI: Amazon EKS supports native VPC networking with the Amazon VPC Container Network Interface (CNI) plugin for Kubernetes. Using this plugin allows Kubernetes pods to have the same IP address inside the pod as they do on the VPC network.
CoreDNS: CoreDNS provides DNS services within EKS Kubernetes clusters. DNS allows individual containers to easily discover and connect to other containers within the cluster.
This add-on is included with every EKS cluster by default.
Kube-proxy: kube-proxy is a network proxy that runs on each node in a Kubernetes cluster. The role of kube-proxy is to reflect the services defined in the cluster and manage the networking rules on a node to allow communications to the pods that back a service.
Amazon EKS Pod Identity Agent: Install EKS Pod Identity Agent to use EKS Pod Identity to grant AWS IAM permissions to pods through Kubernetes service accounts.
Be sure to install the Amazon EKS Pod Identity Agent add-on before creating, editing, or deleting Pod Identity associations. This add-on is required for the EKS Pod Identity feature to function properly.
5. Configure selected add-ons settings
Configure the add-ons for your cluster by selecting settings basically choose the versions.
After completing Step Five review and create the EKS cluster's Master node. After 15 minutes of waiting, we were able to see our cluster with the available state.
We have created the Eks cluster master node, and now we need to create the work node for that we need to create the node group. In the EKS dashboard click the compute option and click Add node groups
To configure a node group you also need to complete the four steps.
1. Configure node group 2. Set compute and scaling configuration 3. Specify networking 4. ReviewConfigure node group: The first and initial step is to configure the node group, add the name for the node group, and also you need to create the IAM role for the node.
Click the IAM role again and create the role with the required permissions.
Now we can choose the use case directly as ec2 and click next.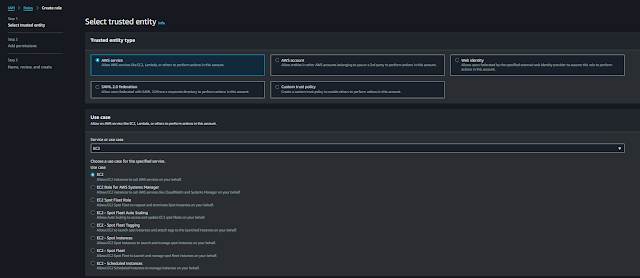
Next step you need to choose the required permission policies, Type “ec2” in the search box and choose the below two policies
1.AmazonEKSWorkerNodePolicy – This policy allows Amazon EKS worker nodes to connect to Amazon EKS Clusters.
2.AmazonEKS_CNI_Policy - This policy provides the Amazon VPC CNI Plugin (amazon-vpc-cni-k8s) the permissions it requires to modify the IP address configuration on your EKS worker nodes. This permission set allows the CNI to list, describe, and modify Elastic Network Interfaces on your behalf.
Again in the search box type “containers” and search it will show you the available policies.
3.AmazonEC2ContainerRegistryReadOnly-- ”(Provides read-only access to Amazon EC2 Container Registry repositories) and click the next option give the name for the role and create the role by clicking the create role option.
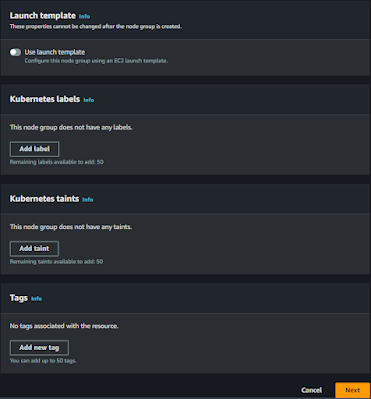
The next option is to use a launch template. If you already have a launch template, we can use it to create the worker node.
The next option is adding the Kubernetes labels, Kubernetes taints, and Tags.
Kubernetes labels:
Kubernetes labels are similar to AWS Tags but are defined within the Kubernetes API. Labels are key/value pairs that are attached to objects within Kubernetes. You can use labels that you define for nodes to determine where pods run.
Define Kubernetes labels to apply to your nodes as part of your node group.
You can apply Kubernetes labels during node group creation and update them at any time.
You can define up to 50 Kubernetes labels for a node group.

Set compute and scaling configuration:
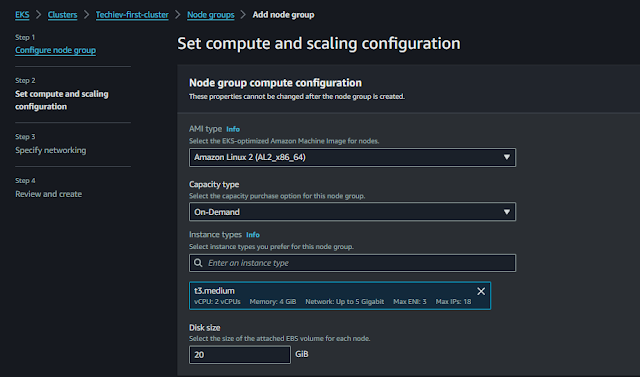
The next step is to Set compute and scaling configuration, here we need to choose instance AMI type, capacity type, instance family, and EBS volume size, if you are using the launch template this one automatically with a matching template.

Next step we need to manage the Node Group scaling configuration, in this options we have three size
1. Desired size – Set the desired number of nodes that the group should launch with initially.
2. Minimum size –Set the minimum number of nodes that the group can scale into.
3. Maximum size –Set the maximum number of nodes that the group can scale out to.
Next, we need to choose the Node group update configuration, here we need to specify the Maximum unavailable and set the maximum number or percentage of unavailable nodes to be tolerated during the node group version update. Click next
Now need to specify the networking option to choose the subnet and if you want to configure the SSH access to nodes just enable it and choose the pem file and security group for the node.
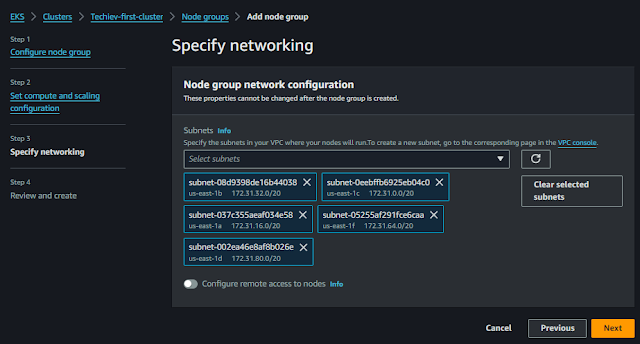

Once completed click next, review, and create a node group after some minutes cluster with node group creation was completed.
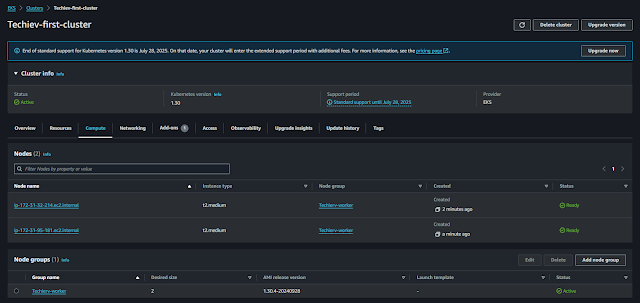
Once The cluster is created we can connect the cluster from your local machine using either Kubectl or Eksctl.
If you have not installed Kubectl check out the blog and configure the Kubectl.
Now need to follow up on the below command to connect the EKS cluster from our machine using Kubectl.
syntax
syntax
Command: aws eks update-kubeconfig --name <EKS_Cluster_Name> --region <Region_Name>
Example: aws eks update-kubeconfig --name Techiev-first-cluster --region us-east-1
Now we can check the Basic Kubectl commands.
kubectl get nodes -- checking the nodes inside the cluster
kubectl get nodes -- checking the nodes inside the cluster
----------------------------------------!!!! Happy Learning with Techiev !!!!!!!!----------------------------------
-------------------------Subscribe our Youtube Channel by clicking the below link----------------------
----------------------------!!https://www.youtube.com/@techieview729!!---------------------


