AWS provides a service called Elastic Load Balancing (ELB), which automatically distributes incoming application traffic across multiple...
AWS provides a service called Elastic Load Balancing (ELB), which automatically distributes incoming application traffic across multiple targets, such as Amazon EC2 instances, containers, and IP addresses. This service enhances the scalability and availability of applications by efficiently managing traffic loads and ensuring that no single resource is overwhelmed
Types of Load Balancers in AWS
1.Application Load Balancer (ALB)
Operates at the application layer (Layer 7) of the OSI model.
Ideal for HTTP and HTTPS traffic.
Supports advanced routing features such as path-based and host-based routing.
2.Network Load Balancer (NLB)
Works at the transport layer (Layer 4).
Designed to handle millions of requests per second while maintaining ultra-low latencies.
Best suited for TCP and UDP traffic.
3.Gateway Load Balancer (GWLB)
Combines a transparent network gateway with a load balancer.
Useful for deploying, scaling, and managing third-party virtual appliances, such as firewalls.
4.Classic Load Balancer(Deprecated)
The original load balancer option that operates at both Layer 4 and Layer 7.
Suitable for applications built within the EC2-Classic network but lacks advanced routing capabilities.
In this Blog going to create ALB(application load balancer) for that we need to create at least Two Instances,
First, we are going to create the EC2 Linux Instance. If you are unaware of making EC2 Linux check out our blog How to Create the First AWS EC2 Linux Instance in free-tier . In my case, I am creating the Amazon-Linux2

Once the EC2 Instance up and running we need to log into the EC2 machine using putty or
PowerShell or using
EC2-Instance connect option.Once connect to the instance ,we need to Install or Configure the Apache/Nginx web server,
To Install Apache in the Amazon-linux2, login to the server and Install the Apache using below commands.
Command: yum install httpd
Once Installed the Apache, we need to start the webserver using below command
Starting the service: service httpd start (or) systemctl start httpd
Checking the status: service httpd status (or) systemctl status httpd
Once the Apache gets started, check the document root from the configuration file
Configuration file path: /etc/httpd/conf/
Configuration file name: httpd.conf
Go to the document root path and create the basic html file like index.html
Command: cd /var/www/html
Alternative Method:
If you are creating the instance you can use user data as an option to pass the shell script of Apache(httpd) installation.
The Below script we can use inside the user data.
#!/bin/bash
yum update -y
yum install -y httpd.x86_64
systemctl start httpd.service
systemctl enable httpd.service
echo “The First Heading” > /var/www/html/index.html
After creating and configuring the Ec2-instances need to check the webpage by running the Server's public Ip address in Browser.
Now we are going to create the ALB( application load balancer)
Go to ec2 console → Load balancing → create Load balancer

Now we are going to create the ALB( application load balancer) for that Navigate to the ec2 Dashboard → Click Load balancing → Click create Load balancer
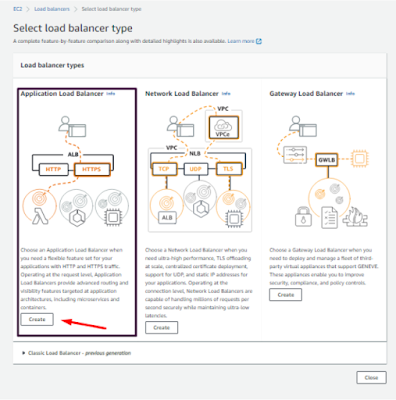
Inside Load balancers, we have four load balancers
1. ALB (Application load balancer)
2. NLB (Network load balancer)
3. GLB (Gateway load balancer)
4. Classic Load Balancer
Now we are going to create the ALB so click the create option in ALB
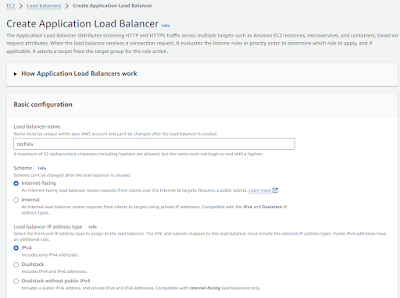
1. Basic configuration
The first step is to give the Load balancer name
Second step is to choose a scheme whether Internet-facing or internal. My application needs to connect in public so I am choosing an internet-facing
Third step is to choose the Ip address type ipv4 or dual stack (ipv4 and ipv6)
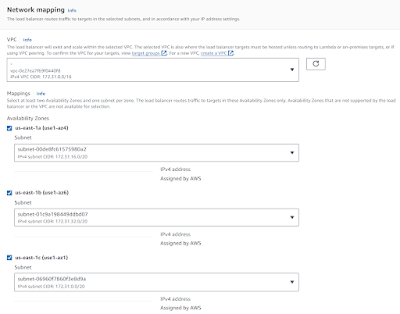
2. Network mapping
In this section, we need to choose a Vpc and a subnet. before choosing the VPC make sure the same Vpc which is used in ec2-instance (your application running server).
Choose at least three different subnets.
3. Security Group.
Here, you need to choose the security group that is already created and used in the ec2-instance (your application-hosted instance)
For the load balancer, you need to create a new security group with http and https accessible inbound rules. If you have an existing load balancer group, you can use that one.

4. Listeners and routing
In this step, we need to create the Target group and listener ports.
If you already have a target group choose that one or need to create the target group.
Creating the Target Group:
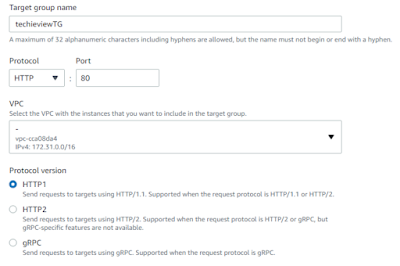
In the first step I need to choose Specify group details, here you have four options, and now i am choosing the instance option.
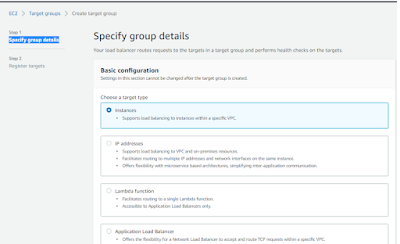
Type the target group name, and choose the protocol for ALB need to choose http or https i am choosing http
Choose the VPC and choose the http version.
Health check configuration:
Choose the protocol for http for a health check and choose the path
If you are using a directory after the document root in the server you need to mention like public_html/
If not you can use the default /
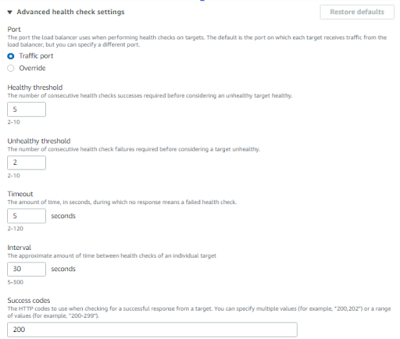
In the health check, we have advanced health settings.
In this section, you need to choose the below one by one
Port: here you need to choose the traffic port for http default 80 if you have a specific port need to choose the override option and enter the port number.
Healthy threshold: The number of consecutive health checks successes required before considering an unhealthy target healthy.
Unhealthy threshold: The number of consecutive health check failures required before considering a target unhealthy.
Timeout: The amount of time, in seconds, during which no response means a failed health check.
Interval: The approximate amount of time between health checks of an individual target.
Success codes: The HTTP codes to use when checking for a successful response from a target. You can specify multiple values (for example, "200,202") or a range of values (for example, "200-299").
After the configuration, you can add tags or click the next option to choose register target options
In this option it will show the available running instance, you need to choose the correct instance for the target.
Once chosen click the including pending as below.

Once click the option it automatically adds to the target group’s pending list, you need to click Create Target Group. it will automatically create the group with the target
It will automatically create a group with a target. now we need to put the target group into the load balancer.
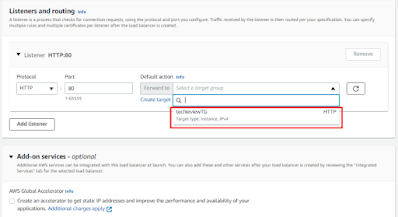
We have an addon service AWS Global Accelerator it is optional only.
Once all is completed let's review the load balancer configurations and create a Load balancer.
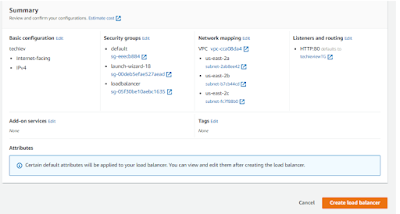
Now the load balancer is in the provisioning state. It takes 5 to 10 minutes to create and it will change to active.
Once the Load balancer is created we need to go to the target group and check whether our attached target is in the healthy state
Go to Load balancing → Target groups → click your target group → click targets
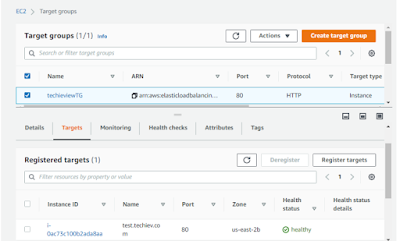
Now click the load balancer, in the description we can see A record, copy the A record, and paste it into the browser. Now you can see the basic html web page which is in the target server.

Now assume we have three servers. We need to route the traffic between all the servers.
Now currently we have only one server with Apache configuration, so we need to create another two servers. so we need to create the AMI for the current server so that we can use AMI to create another two servers.
Creating AMI→ Choose ec2-instance→ right-click or choose actions→ Images and templates→ Create Image
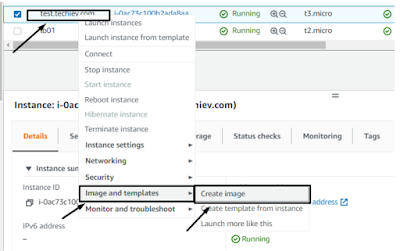
Once AMI is created, using that AMI we need to create the two servers along with the http protocol added security group.
Once created, name it Lb01 and lb02 for our understanding.
Now login to both lb01 and lb02 start the Apache server and create the index.html file inside the /var/www/html with different content.
Once all the above steps are done now we need to go to the Target group and add the lb01 and lb02 as targets
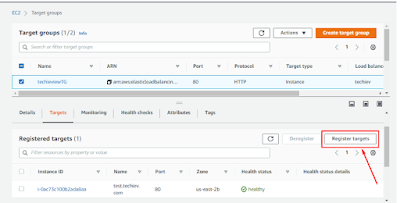
Click target group → choose the correct target group → target → click register targets.
Choose lb01 and lb02 and add the targets as included as pending below and click register pending targets.
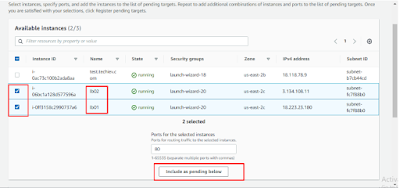
It will check the health check for newly added servers and once it goes healthy we are good to go.
Now check the load balancer A record in the url, First, you will get the web page from the main primary server.
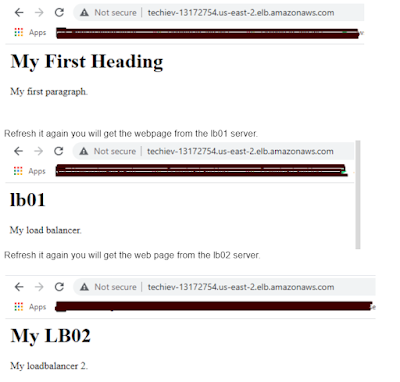
Now we have completed the Load Balancer, if we want to load the different URLs hosted in the different servers like the one below.
Now we have used the default load balancer A record to verify the working flow, if we need to use the load balancer for our live websites with a URL how to do that using Route53 or any other DNS providers.
----------------------------------------!!!! Happy Learning with Techiev !!!!!!!!----------------------------------
-------------------------Subscribe our Youtube Channel by clicking the below link----------------------
----------------------------!!
https://www.youtube.com/@techieview729!!---------------------


